The firewall system of Windows 10 is of great use. However, it could be even more effective if you know how to use the Firewall system. With Windows 10 firewall, you can better control what goes in and out of your system. You can even set up Windows Firewall to log connections that go through it. However, enabling logs for Windows Firewall is a complicated process as it requires lots of menu diving and settings. So, if you are interested in tracking internet activity using a Windows firewall log, you need to implement the steps given in this article.
Steps to track Internet Activity Using Windows Firewall
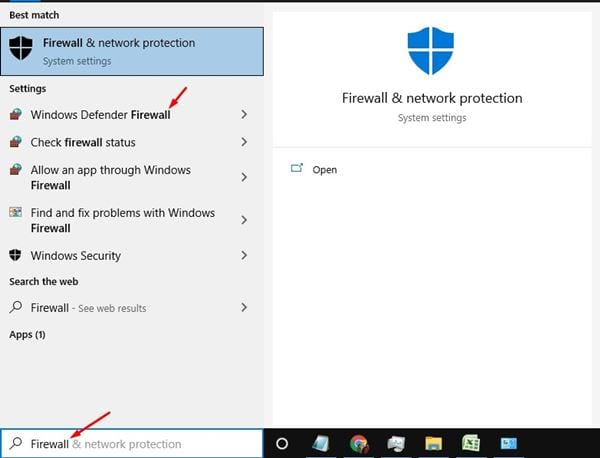
This article will share a detailed guide on how to track internet activity using a Windows Firewall log. So, let’s check out. Step 1. First of all, open Windows 10 search and type in ‘Firewall.’ Open the Windows Defender Firewall option.
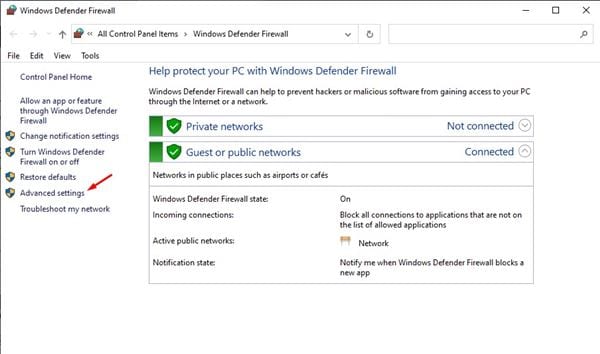
Step 2. On the next page, click on the ‘Advanced Settings’ option.
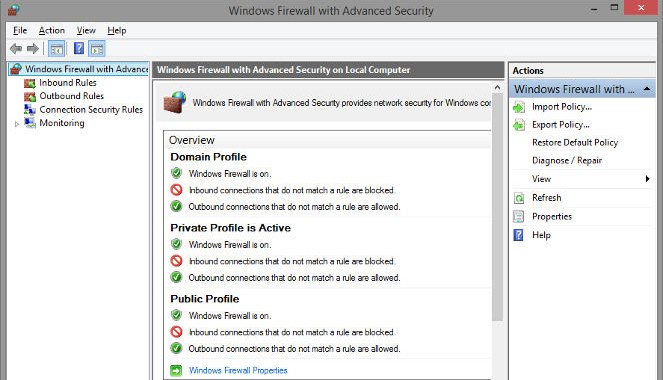
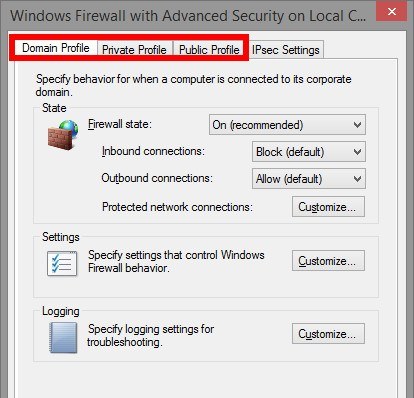
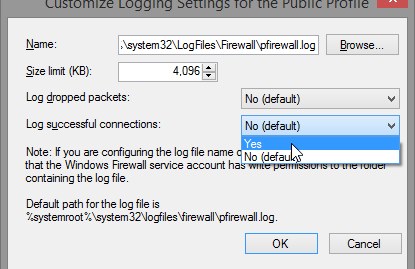
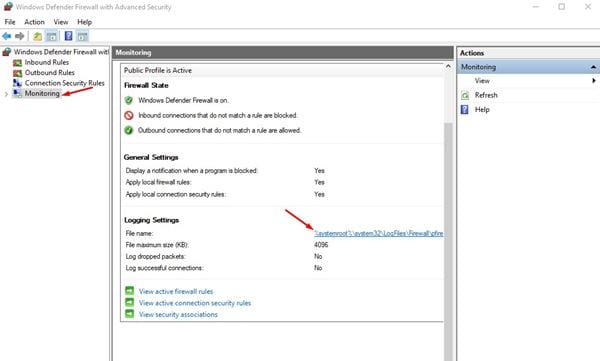
Step 3. Select the “Windows Firewall with Advanced Security on Local Computer” option placed on the left pane to access the Log settings. After that, click on the properties from the right pane. Step 4. You can see up the “Logging” option for all the tabs. Here’s what each tab represents. Domain Profile: This is a profile that you need to access if you are working on the connection that is Wifi network where the domain name is given by the Domain controller. You may not need to access this profile, as it is not usually used in home networks. Private Profile: This is the profile you will require to access if you are working on any private network connection. This also includes your home and personal networks. This is the selection you are more likely to access. Public Profile: This is the profile you will require to access if you are working on any public network connection like Public WiFi. Depending on the type of connection, you have just selected up the Log option for that tab only. Step 5. Now the time comes where you will; have to start the Logging process. To do that, Just set up both of the drops down menus to “Yes” and then come out of the Panel by clicking the OK button. Step 6. After the above step is completed, the computer will start logging the whole firewall activity. To view the log, head to the Advanced Settings window, click the “Monitoring” option on the left, and then under the “Logging Settings,” Click the link behind the File name.
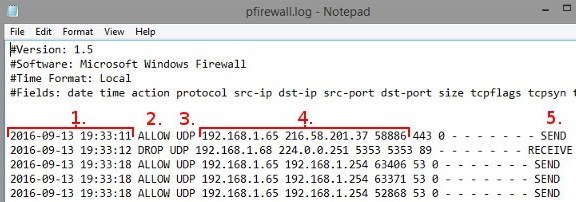
Step 7. This file is the Log file, and hence it will open on the device’s screen. Here’s what each of the parts marked in the screenshot represents
- The section shows the date and time when the connection is established.
- The section shows whether Firewall has allowed the connection or blocked it. The Allow means the connection is through, while ‘Drop’ means Firewall has blocked it.
- The section represents the type of connection – TCP or UDP
- The section shows the following in order – The IP Address of your PC, the IP of the destination, and the port used on your computer.
- The section represents whether your computer has sent a packet of data or received one. Analyzing the Firewall look might look complicated, but once you master it, it becomes easy. You first need to learn how to analyze certain aspects of the Firewall to utilize the feature fully. This article is all about tracking internet activity for free by using a Windows Firewall log. I hope this article helped you! Please share it with your friends also. If you have any doubts about this, let us know in the comment box below.

